TileLogicTM             
 
Menu

MAPPING Window

MAPPING Window
 
1

Mapped point display

1. Mapped point display
 
PT#: - The next data point number to be logged.
DIST: - The distance ( ft.) from the last logged point.
 
2

LOG DATA button

2. LOG DATA button     Toggles Logging of data on/off.  [SPACEBAR]


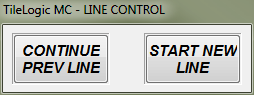
If you begin logging data, you may see this decision box pop up above the "LOG DATA" button:


This will occur when begining logging to a layer with the style "Line" or "EX_tile" AND the previous point was also on the same layer (excluding POI's).  In this case, TileLogic needs to know if logging is continuing a previous line, or starting a new one.  It could be a case, where mapping of a probed line was stopped to maneuver around an obstacle, and once back over the probed line, mapping data to that line should continue.
 
This decision box will not pop up if you were previously logging to a different layer, even if the style was the same, TileLogic assumes you are starting a new line.
Note: that in Machine Control, if the user does not respond in 5 seconds, TileLogic assumes you are continuing the previous line.  This is NOT applicable in TileLogic MAP.
 
In mapping mode, NO LOGGING will occur until the decision box is dispatched.
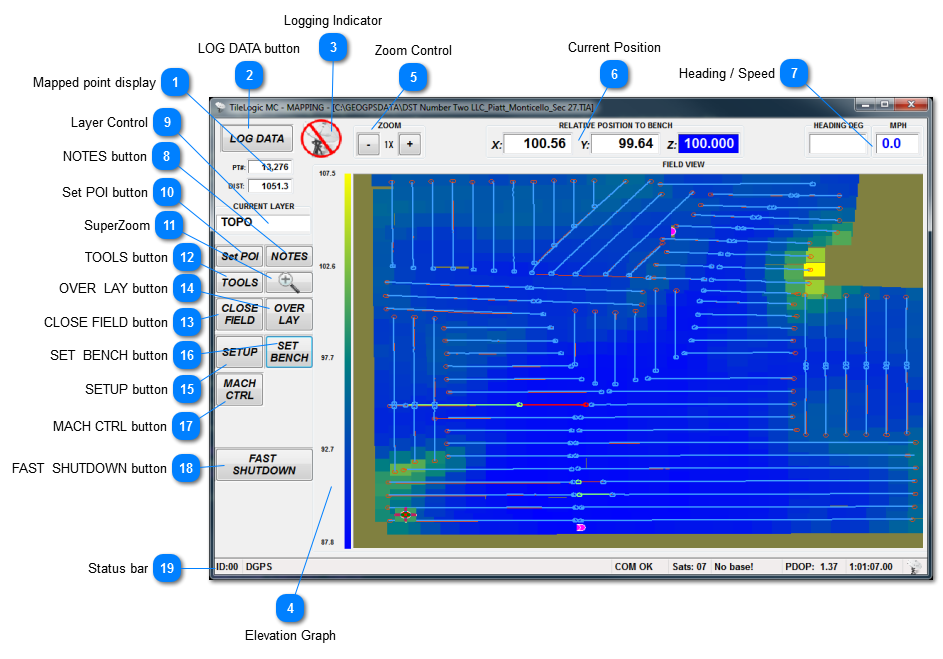
 
 
3

Logging Indicator

3. Logging Indicator              
Logging off.         Logging On.
 
4

Elevation Graph

Graphical display of mapped elevations and color codes.
 
The maximum elevation of layers with TOPO style. (Field max elevation)
4. Elevation Graph
            The minimum elevation of layers with TOPO style. (Field min elevation)
5

Zoom Control

5. Zoom Control
  • - Zoom out [PGDN]
  • X Magnification factor indicator
  • + Zoom in [PGUP]
 
Zooms relative to current location (shown by cursor location).  Max zoom = 64X. 
6

Current Position

6. Current Position
Current position coordinates relative the the current Bench location.
7

Heading / Speed

7. Heading / Speed     Display of heading (0 - 360) and speed as reported by the GPS receiver.  Note this depends on optional equates %HEADING and %MPHKPH being specified in the TLuser.txt file.
8

NOTES button

8. NOTES button     Click to open the Field Notes window. [ALT+N]
9

Layer Control

9. Layer Control     Displays the current mapping layer.  Click on this to open the Layer window. [ALT+L]
10

Set POI button

10. Set POI button     Click to open the POI window. [ALT+P]
11

SuperZoom

11. SuperZoom     Click to open a small window which shows a "super zoom" of the current location.  Useful for layout purposes.
12

TOOLS button

12. TOOLS button     Click to open the Tools toolbar. [ALT+T]
13

CLOSE FIELD button

13. CLOSE FIELD button     Click to close and save the current field. [ALT+F]
14

OVER  LAY button

14. OVER  LAY button     Click to open the Import and Overlay window. [ALT+O]
15

SETUP button

15. SETUP button     Click to open the Map Setup window. [ALT+S]
16

SET  BENCH button

16. SET  BENCH button     Click to open the Bench window. [ALT+B]
17

MACH CTRL button

17. MACH CTRL button     Click to open the Machine Control window.  Not available with TileLogic MAP. [ALT+M]
18

FAST  SHUTDOWN button

18. FAST  SHUTDOWN button     Available only in TileLogic MC.  Sets Bench, closes and saves field, exits program, and turns computer off. [ALT+F]
19

Status bar

19. Status bar
Status bar is shared with the main window.